Understanding Heat Transfer Systems in NZ
We’ve all been there: the log burner is roaring, and you’re sitting in the lounge in a t-shirt, yet the bedrooms down the hall require a puffer jacket. This frustrating extreme is known as heat stratification, where the warmth you have already paid for floats uselessly against your ceiling.
According to Energywise guidelines, a healthy house shouldn’t suffer from drastic temperature drops between living spaces. In practice, many Kiwi homes trap all their energy in a single “source room” while distant “destination rooms” stay cold, leading to the dreaded morning routine of wiping down crying windows.
You don’t necessarily need to buy more heaters to fix this daily imbalance. A heat transfer system bridges the gap by physically moving trapped hot air. Rather than generating warmth from scratch, a heat transfer system helps NZ homeowners with efficient heat distribution system.
The Three-Part Recipe for a Warm House: Fans, Ducting, and the Physics of Airflow
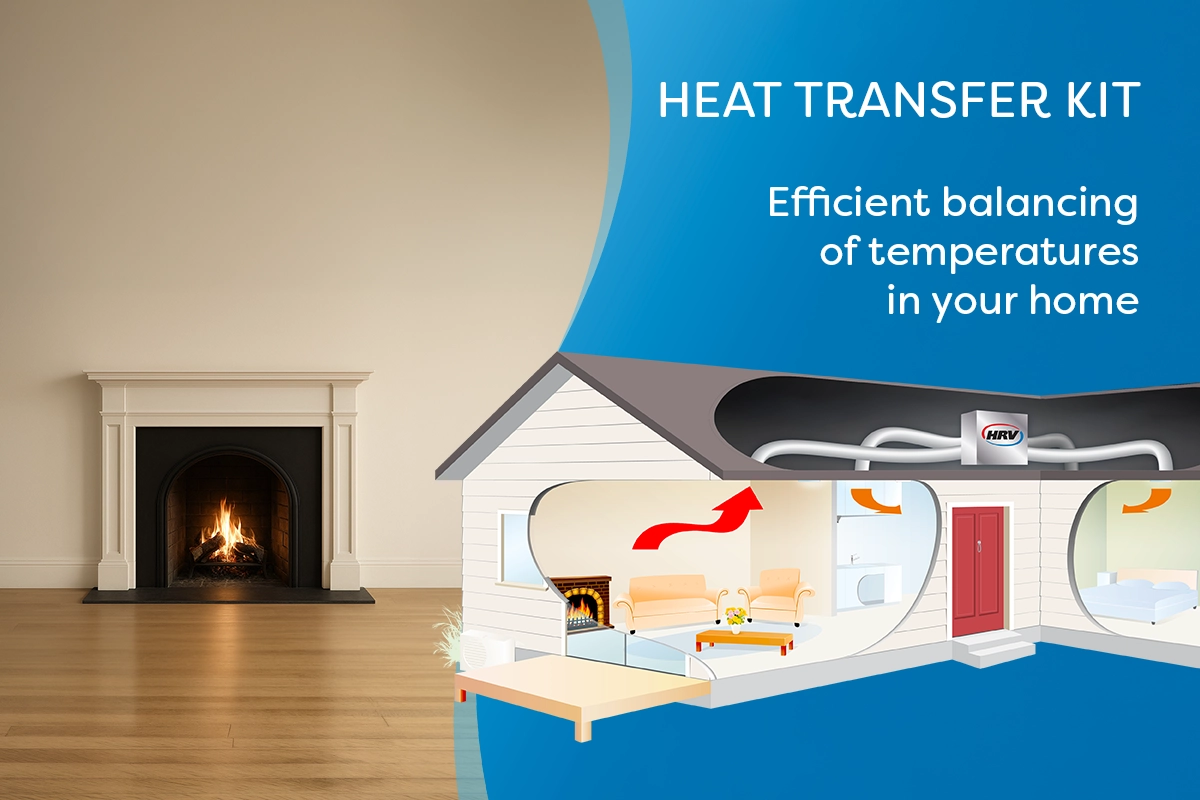
Since we know hot air naturally rises, the absolute warmest spot in your lounge is usually uselessly hovering right against the ceiling. To capture that trapped heat and move it down the hallway, a system relies on three specific hardware components:
- The Intake Vent: Positioned directly above your heat source to catch the warmest air.
- The Heat Transfer Fan: A hidden “inline fan” motor that pushes the air through the roof.
- The Heat Transfer Ducting: The flexible motorway connecting your living area to the bedrooms.
Think of your winter roof space as a freezing chilly bin. If you push warmth through thin, uninsulated pipes, it turns cold before ever reaching the bedrooms. This is why quality ducting needs an “R-value” (a standard measure of insulation) of at least R1.0. This thick lining acts like a puffer jacket, preventing heat loss during the attic journey.
The inline motor doing the heavy lifting sits midway along this motorway, intentionally suspended far from bedroom ceilings to eliminate vibration. Upgrading to acoustic ducting for warmth distribution acts like a muffler, guaranteeing a quiet sleep. Yet, even the best hardware cannot share warmth that does not exist.
Is Your Heat Source Strong Enough? Why a 3-Room Kit Needs a Roaring Fire
A common trap is expecting a small lounge heater to warm a whole house. You simply cannot move heat that does not exist. If your lounge is barely comfortable, stealing that air leaves the living space freezing while pushing lukewarm breezes down the hall. This total heating demand is your home’s “thermal load.” To successfully run a 3-room heat transfer kit, you need “surplus heat capacity” meaning your primary heater creates much more warmth than the lounge itself actually requires.
Because of this need for excess power, enclosed wood burners are the absolute gold standard. A roaring fire easily produces 15kW to 20kW of heat, providing abundant surplus warmth to share. Conversely, attempting to distribute heat from a low-output electric panel is guaranteed to fail. Before stressing over the average heat transfer system cost is NZ, ensure your primary source can handle the extra thermal load.
Finding the best heat transfer system in NZ ultimately relies on having a heavy-lifting heat source. Once you secure enough surplus warmth, the next challenge is controlling airflow without creating a chilly wind tunnel in the hallway. Solving the ‘noise and draft’ problem requires smart thermostats and an understanding of return air.
Solving the ‘Noise and Draft’ Problem: Thermostats and the Science of Return Air
Imagine a crowded room: if you push more people inside, someone must leave. Bedrooms work the same way. When an air transfer fan pushes warm lounge air into a closed bedroom, that air needs an escape route. If doors are sealed tight against the carpet, the system chokes. Leaving a 15mm gap under bedroom doors creates essential “return air,” letting heavy cold air flow down the hallway back toward the lounge.
Calibration is equally crucial to avoid drafts. While smart thermostat controls for ventilation sit near your fire, setting the trigger point too low like 18°C causes frustrating problems. The system activates before the lounge is genuinely hot, blasting a lukewarm breeze down the hall that actually makes bedrooms feel colder. Always set the trigger above 25°C so only thoroughly heated air moves.
With airflow balanced and noise managed, the next step is addressing winter dampness.
Heat Transfer vs. Positive Pressure: Which System Actually Stops Crying Windows?
If morning chores involve wiping puddles off the glass, moving warm air down the hallway won’t help. Understanding heat transfer vs positive pressure ventilation comes down to identifying your home’s primary enemy: cold or damp? Heat transfer simply shuffles existing indoor air, meaning moisture just gets relocated. Positive pressure systems, however, actively fight moisture by forcing dry, filtered attic air into your living spaces, naturally pushing wet air outside.
Because it only recycles stale air, a heat transfer setup doesn’t qualify as Healthy Homes Standards ventilation under New Zealand law. Genuine fresh air requires an external source to meet modern building codes. This legal distinction highlights a practical truth: resolving dampness requires replacing wet air, not just warming it.
Modern heat recovery ventilation offers the ultimate solution by capturing existing warmth while introducing fresh outside air. It remains the most energy-efficient method for reducing window condensation permanently. Moving these concepts into practical comfort requires a structured approach.
Your 3-Step Plan to a Healthier Home: Moving from Concept to Comfort
Banishing crying windows and sharing trapped lounge warmth comes down to four practical steps:
- Confirm your heat source is sufficiently powerful.
- Choose an HRV Heat Transfer kit for your home.
- Plan your annual roof cavity filter maintenance.
Tonight, stand on a chair and check your lounge ceiling temperature. That wasted heat is your cold-bedroom solution, waiting to be moved.

Online recommendation builder
Find HRV products to suit your home in around 2 minutes.
Get a recommendation